
You send a prompt. You get a response. It feels almost instant — a second or two, maybe less. But between your code and that first streamed token, your request passes through multiple layers of infrastructure, gets transformed, routed, processed, and shaped before any “thinking” even begins.
Most explanations of how LLM APIs work jump straight to inference — attention mechanisms, transformers, token generation. That’s like explaining how a car works by starting at the engine. What about the ignition? The fuel system? The road you chose to drive on?
As a developer building on these APIs, I kept noticing something: the parts I actually control matter more to my output quality than the parts I don’t. The model’s behavior isn’t just decided during inference. It’s shaped earlier — by prompt assembly, context selection, and tool availability. And those are exactly the parts most diagrams skip.
I’m not building inference engines. I’m building on top of them. This is the mental model I wish I had when I started.
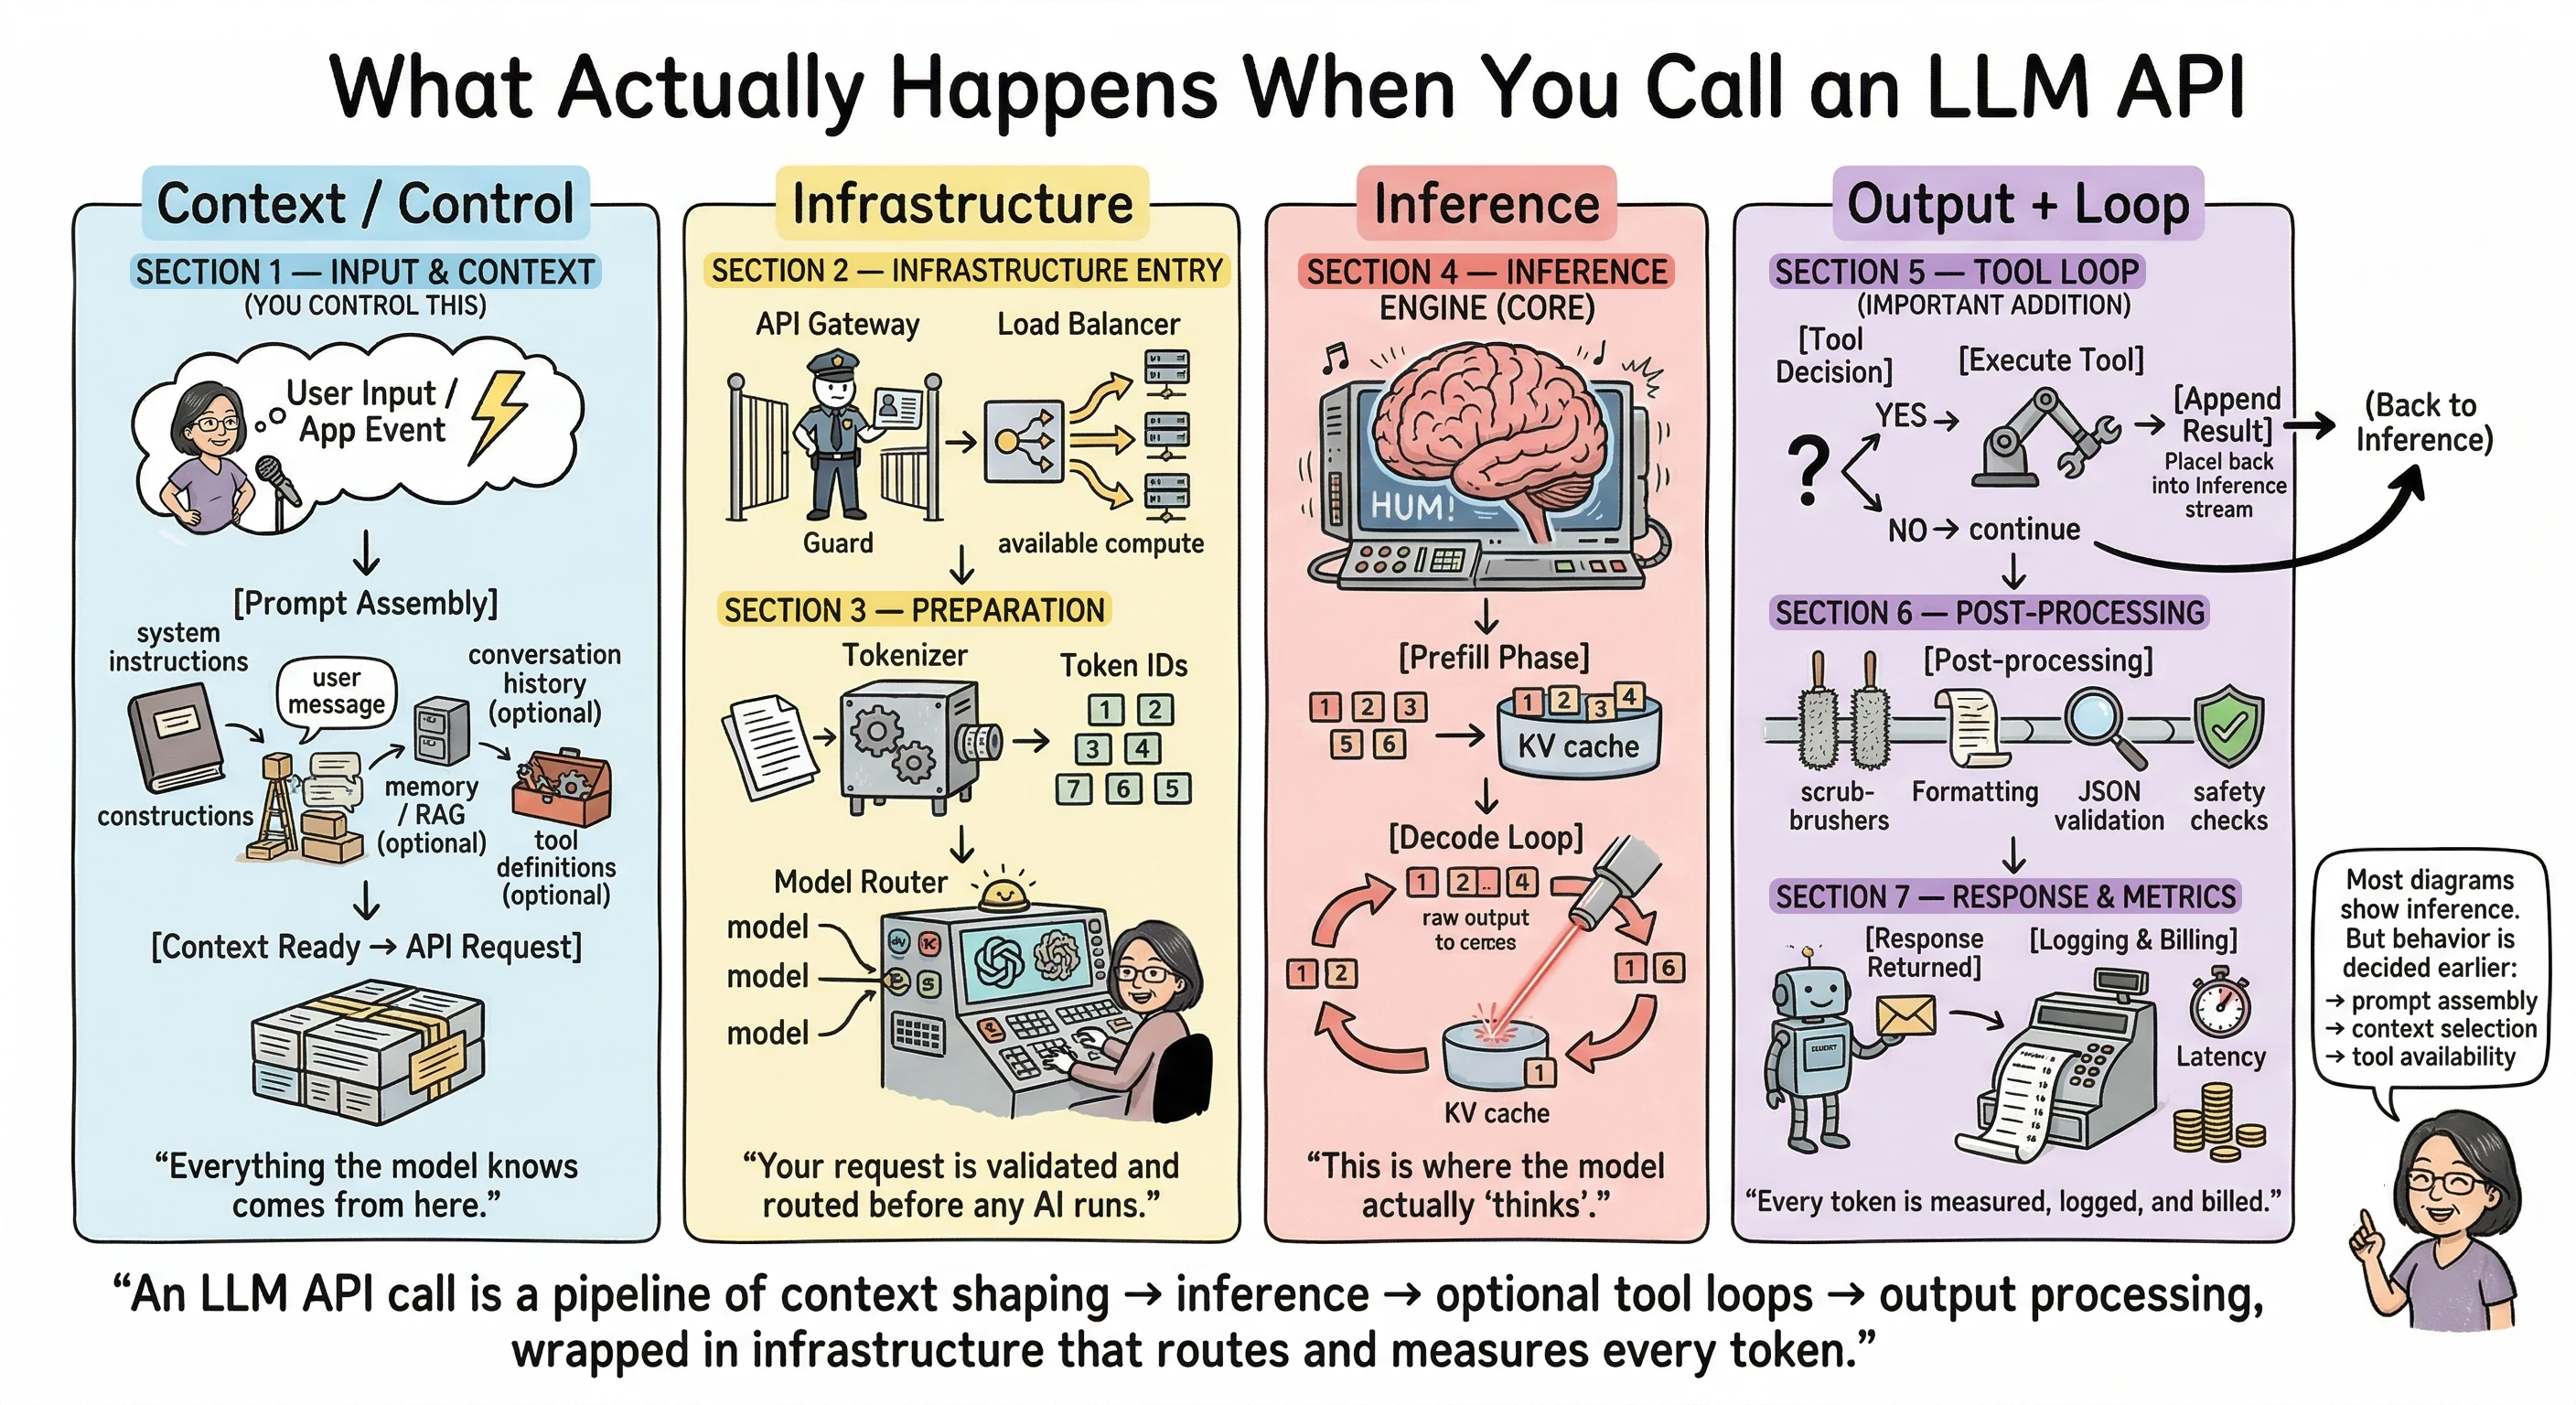
Let’s walk through all seven stages, grouped into four phases: what you control, what the provider handles, what the model does, and what happens after.
Phase 1: Context and Control
Section 1 — Input and Context
“Everything the model knows comes from here.”
The API call doesn’t start at the API. It starts in your code.
Before your request ever hits a server, there’s a critical step that most tutorials gloss over: prompt assembly. This is where you construct the model’s entire reality — everything it will know and everything it won’t.
A typical API call includes a messages array. Tutorials show you something like:
{
  "messages": [{ "role": "user", "content": "Hello" }]
}
And that’s technically correct. It works. But in production, that messages array is assembled from multiple sources:
- System instructions — the behavioral rules you set for the model. How it should respond, what role it plays, what constraints it follows.
- User message — the actual input from the person or event that triggered the call.
- Conversation history — previous turns in the conversation, if you’re building something multi-turn. You decide how much history to include.
- Retrieved context — results from a vector database, a knowledge base, or a RAG (Retrieval Augmented Generation) pipeline. This is how you give the model information it wasn’t trained on.
- Memory — if your application maintains any form of persistent memory across sessions, it gets injected here.
- Tool definitions — if the model can call functions, search the web, or interact with external services, those capabilities are defined in this request.
Every one of these components is optional except the user message. But each one you include (or exclude) shapes the model’s behavior. The context window isn’t just a size limit — it’s a budget. What you choose to spend it on is an engineering decision.
This is the highest-leverage stage in the entire pipeline. A carefully assembled context can make a mediocre model produce great output. A sloppy context can make the best model produce nonsense. The assembly logic is the product.
Phase 2: Infrastructure
Section 2 — Infrastructure Entry
“Your request is validated and routed before any AI runs.”
Once your assembled request leaves your code, it hits the provider’s API gateway. This is standard web infrastructure — the same kind of gateway that sits in front of any large-scale API.
Here, your request gets authenticated (is your API key valid?), and rate limits are enforced (have you exceeded your allowed requests per minute?). If you’ve ever received a 429 Too Many Requests error, that’s this layer doing its job.
After authentication, a load balancer routes your request to available compute resources. Providers run large GPU clusters, and the load balancer decides which cluster or instance handles your specific call. This is why identical prompts can return with slightly different latency — the routing path may differ each time.
None of this is unique to LLMs. It’s the same infrastructure pattern behind any cloud API at scale. But it’s worth knowing it exists, because when things go wrong (timeouts, rate limits, inconsistent latency), the problem often lives here, not in the model itself.
Section 3 — Preparation
“Text becomes numbers. The system decides which model handles it.”
Before inference can begin, your text needs to be converted into something the model can process. This is tokenization — your prompt gets broken down into token IDs, which are numerical representations of words, subwords, or characters.
Different providers use different tokenizers (you may have heard of BPE, SentencePiece, or similar approaches), and the exact way text gets split into tokens varies. This matters for one very practical reason: token count determines your cost. Every provider’s pricing page bills by the number of input and output tokens.
After tokenization, there’s another layer that’s rarely discussed publicly: model routing. If a provider offers multiple model sizes, or runs different versions of a model across their infrastructure, something needs to decide which specific model instance handles your request. The details of how providers route requests internally aren’t publicly documented, and I won’t pretend to know exactly how any specific provider does it. But knowing this layer exists helps explain why you might occasionally see slightly different behavior or response times on the same prompt and model.
Phase 3: Inference
Section 4 — The Inference Engine
“This is where the model actually ‘thinks.’”
This is the stage everyone wants to understand. It’s also the stage you influence least directly.
Inference happens in two phases:
The prefill phase processes all your input tokens. The model reads your entire assembled context — system prompt, user message, conversation history, tool definitions, all of it — and builds an internal representation. This is commonly referred to as the KV cache (key-value cache). The longer your prompt, the more work happens here, and the longer you wait before seeing the first output token. This is why long system prompts and large context windows have a real cost beyond just token pricing — they increase your time-to-first-token.
The decode loop is where output gets generated, one token at a time. Each new token is informed by everything that came before it — both your input and the tokens the model has already generated. This is the autoregressive loop, and it’s why LLM responses stream in token by token rather than appearing all at once. Streaming exists because of this architecture: each token can be sent to you as it’s generated, giving the user the experience of watching the response unfold in real time.
The sampling parameters you set in your API call — temperature, top_p, top_k — influence how the model picks each next token during this loop. Lower temperature means more predictable output; higher means more creative variation. These parameters are well-documented in every provider’s API reference.
This phase is where most of your wait time goes. But here’s the thing: you don’t change how attention works. You don’t redesign the decode loop. Your leverage as a developer is in what you send the model (Phase 1) and what you do with its output (Phase 4). The inference engine does its thing. Your job is to set it up for success.
Phase 4: Output and Loop
Section 5 — The Tool Loop
“The model may pause, use tools, and continue reasoning.”
This is the section most LLM pipeline diagrams skip entirely. And in 2025, it might be the most important one to understand.
When you include tool definitions in your API request (Phase 1), you’re giving the model the ability to do something other than generate text. It can choose to call a function, run a web search, query a database, or interact with an external service through protocols like MCP (Model Context Protocol).
When the model decides to use a tool, here’s what happens:
- Instead of generating a final text response, the model outputs a tool call — a structured request saying “I want to call this function with these arguments.”
- Your code (or the provider’s infrastructure) executes the tool and gets a result.
- The tool result gets appended to the context.
- Inference runs again — the model now has the original prompt plus the tool result, and it continues generating from there.
This is the agentic loop. One user prompt can trigger multiple inference passes. The model might search the web, read the results, decide it needs more information, search again, and then finally compose a response. Each loop means more tokens processed, more latency, and more cost.
If you’re building anything with tool use — and increasingly, most production LLM applications are — understanding this loop is essential. It’s the difference between a straightforward API call and a complex chain of operations that can run up your token bill quickly. I learned this the expensive way.
Section 6 — Post-Processing
“Output is cleaned and validated before returning.”
Once the model finishes generating (either because it reached a natural stopping point, hit your max token limit, or completed a tool loop), the raw output tokens go through post-processing.
The tokens get converted back to readable text (detokenization). Safety classifiers and content moderation systems evaluate the output — every major provider runs these. If you’ve ever received a response that was blocked or flagged by a content filter, that’s this stage at work.
For structured output requests (like JSON mode), validation happens here too. The output gets checked against the expected format.
There’s a small but useful detail that lives in this stage: the finish_reason field in your API response. It tells you why generation stopped:
stop— the model reached a natural endinglength— it hit your max token limitcontent_filter— the output was blocked by safety systemstool_use— the model wants to call a tool (back to Section 5)
This field is your diagnostic tool. If your responses keep getting cut off, check the finish reason before assuming the model is broken.
Section 7 — Response and Metrics
“Every token is measured, logged, and billed.”
Your response arrives either as streaming chunks (Server-Sent Events) or as a complete JSON response, depending on how you configured the request.
Every response includes usage metadata: how many tokens were in your prompt, how many tokens were generated, and the total. This is your billing data. Input and output tokens are priced separately, with output tokens typically costing more — check your provider’s current pricing page for exact rates, as these change.
On the provider side, everything gets logged: which model handled the request, token counts, latency, finish reason, and safety flags. This feeds their monitoring dashboards, abuse detection systems, and capacity planning.
Where Your Leverage Actually Is
If you take one thing from this article, let it be this:
An LLM API call is a pipeline of context shaping → inference → optional tool loops → output processing, wrapped in infrastructure that routes and measures every token.
Every stage matters, but they’re not equally within your control. Your real leverage as a developer is in three places:
- What you put in the context — you control this completely, and it has the highest impact on output quality.
- How you design tool loops — you decide what tools the model can use and how results flow back into the conversation.
- How you parse and validate output — you own error handling, retries, and what happens when things don’t come back as expected.
The inference engine is impressive. But it’s the part you influence least. Your craft as a developer building on LLMs lives in everything around inference.
Next time your API call returns something unexpected, don’t start by blaming the model. Trace the pipeline. Start with what you sent it.
Jargon Decoder: Frequently Asked Questions
What is prompt assembly?
Prompt assembly is the process of constructing the full input that gets sent to the model. It’s not just the user’s message — it includes system instructions, conversation history, retrieved context from databases or documents (RAG), memory, and tool definitions. All of this gets stitched together in your code before the API call is made. The model only knows what you include here. That’s why prompt assembly is the highest-leverage stage in the pipeline — it defines the model’s entire reality.
What is tokenization?
Tokenization is how text gets converted into numbers the model can process. Your prompt gets broken into small pieces called tokens — sometimes whole words, sometimes parts of words, sometimes individual characters. Each token maps to a numerical ID. Different providers use different tokenization methods (BPE, SentencePiece, and others), which is why the same text can produce different token counts across different models. Token count matters because it directly determines your cost — providers bill by the number of tokens processed.
What is a KV cache?
KV stands for key-value. During the prefill phase, when the model processes all your input tokens, it creates a compressed internal representation of your context. This is the KV cache. Think of it as the model’s working memory for that specific request — a structured snapshot of everything it just read. During the decode phase (when the model generates output), each new token references this cache instead of re-reading the entire input from scratch. That’s what makes token-by-token generation efficient. Without the KV cache, the model would have to reprocess all input tokens for every single output token it generates.
What is the prefill phase?
The prefill phase is the first step of inference. The model processes all your input tokens in parallel and builds the KV cache. This is why longer prompts mean a longer wait before you see the first output token — more input tokens means more work during prefill. The prefill phase happens once per inference pass. After it completes, the model moves to the decode phase.
What is the decode loop?
The decode loop is how the model generates its response, one token at a time. After the prefill phase builds the KV cache, the model predicts the next most likely token, adds it to the output, and then uses that updated context to predict the token after that. This repeats until the model reaches a stopping point, hits your max token limit, or decides to call a tool. This autoregressive loop is why LLM responses can be streamed — each token is available as soon as it’s generated.
What are temperature, top_p, and top_k?
These are sampling parameters that control how the model picks each next token during the decode loop. Temperature adjusts randomness — lower values (like 0.1) make the model more predictable and focused, higher values (like 1.0) make it more varied and creative. Top_p (nucleus sampling) limits the model to choosing from the smallest set of tokens whose combined probability exceeds a threshold. Top_k limits the model to choosing from the k most likely tokens. These are set in your API call and are documented in every provider’s API reference.
What is the tool loop?
When you give a model tool definitions in your API request, the model can choose to call a tool instead of generating a text response. When it does, the tool executes, the result gets added to the context, and inference runs again. This cycle can repeat multiple times — the model might call several tools before producing a final answer. This is the agentic loop, and it’s why a single user prompt can trigger multiple inference passes, multiplying both cost and latency.
What is MCP?
MCP stands for Model Context Protocol. It’s an open protocol that standardizes how AI models connect to external tools and services — databases, APIs, file systems, web search, and more. Instead of each provider having a completely different way to define and call tools, MCP provides a common interface. If you’re building applications where the model needs to interact with the outside world, MCP is increasingly the standard way to do it.
What does finish_reason tell me?
The finish_reason field in your API response tells you why the model stopped generating. The common values are: stop (the model reached a natural ending), length (it hit your max token limit — your response may be incomplete), content_filter (the output was blocked by safety systems), and tool_use (the model wants to call a tool and is waiting for the result). This field is your first diagnostic check when something seems off with a response.
What is RAG?
RAG stands for Retrieval Augmented Generation. It’s a pattern where you retrieve relevant information from an external source — a database, a document collection, a knowledge base — and include it in the prompt before sending it to the model. This lets the model work with information it wasn’t trained on, like your company’s internal docs or recent data. The retrieval happens in your code during prompt assembly (Section 1), and the results get injected into the context alongside the user’s message.
Why are output tokens more expensive than input tokens?
Input tokens are processed in parallel during the prefill phase — the model reads them all at once. Output tokens are generated sequentially in the decode loop — one at a time, each requiring a separate forward pass through the model. Sequential generation is more compute-intensive per token than parallel processing, which is why providers typically charge more for output tokens. Check your provider’s pricing page for current rates, as these vary by model and change over time.
What is streaming and why does it exist?
Streaming delivers the model’s response token by token as each one is generated, rather than waiting for the entire response to complete. It uses Server-Sent Events (SSE) — a standard web protocol for pushing updates from server to client. Streaming exists because of how the decode loop works: since tokens are generated one at a time, each one can be sent immediately. This gives users the experience of watching the response appear in real time, which feels much faster than waiting several seconds for a complete response to arrive all at once.
What is autoregressive generation?
Autoregressive means the model generates output one piece at a time, where each new piece depends on everything that came before it. The model predicts the next token, adds it to the sequence, then uses the updated sequence to predict the token after that. It’s called “autoregressive” because the model’s own output becomes part of its input for the next step. This is different from models that generate all outputs simultaneously. It’s also why you can’t just “skip ahead” to the end of a response — every token depends on the ones before it.
Most diagrams show inference. But behavior is decided earlier — in prompt assembly, context selection, and tool availability. That’s the inside scoop.
Explore the Framework
These concepts are part of a broader framework for building intent-aware AI systems. I've distilled these strategies into a short, practical guide called Thinking Modes.
View the Book →Carmelyne is a Full Stack Developer and AI Systems Architect. She is a previously US-bound Filipino solopreneur, former Media and Information Literacy and Empowerment Technologies instructor, and the author of Thinking Modes: How to Think With AI — The Missing Skill.